Sertifi Intelligent Tags
With Sertifi Intelligent Tags you can embed tags in a document that create signature locations and other Sertifi data boxes. This way, you can send documents with signing boxes and other Sertifi data boxes, without updating your documents manually each time you send a request. Sertifi provides tags for both text documents, like Microsoft Word Documents, and PDF documents. By entering in a tag in the appropriate format, when Sertifi sends your document for signature, a graphic appears asking for your client's information, so your client never sees the intelligent tag code.
This article contains the following sections:
See these related articles:
- Text tags for Word documents
- Fillable PDF tags for PDFs
- Field creation tags
- Sertifi Data Integration
Sertifi Intelligent Tag types
Sertifi provides nine different tag and data boxes you can add to your documents. You can enter these tags to your documents as either a text tag or fillable PDF tag.
Add text tags to a Microsoft Word or PDF document as regular, formatted text.
Add fillable PDF tags to a PDF using the field name of the text fields.
You can add the following tags as either text or fillable PDF, depending on your needs:
- Full Signature Stamp – you can only use a full signature stamp once in a document to collect a signature with additional information. This tag displays the following information:
- Signed name
- Signed date and time
- Signer's email address
- Signer's IP address
- Unique Document ID
- Small Signature Box – you can use this box as many times as you need in a document to collect a signature. This box displays the signed name and signer's email address.
- Initial Box – you can use this box as many times as you need in a document to collect initials. This box displays the signer's initials.
- Date Box – you can use this box as many times as you need in a document to collect the date the signer completes the document. This box displays the date of signing.
- Company Box – you can use this box as many times as you need in a document to collect the company name of the signer. This box displays only the company name.
- Title Box – you can use this box as many times as you need in a document to collect the title of the signer. This box displays only the title of the signer.
- Custom Box – you can use custom boxes as many times as you need in a document to collect data that's important to your document. The custom box displays whatever information you specify to collect.
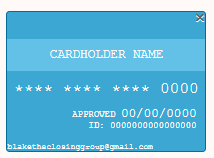
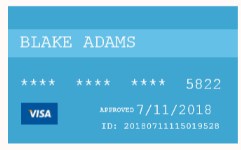
- In Document Payment Authorization – you can use this authorization graphic as many times as you need in a document to collect payment information from the signer. This graphic displays the following information:
- Last four digits of the credit card number
- Card type
- Approval date
- ID of the transaction
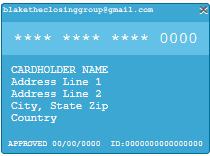
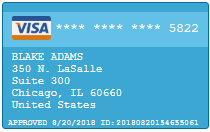
- In Document Payment Authorization Address - you can use this authorization graphic as many times as you need in a document to collect payment information, along with address information, from the signer. The graphic displays the following information:
- Last four digits of the credit card number
- Card type
- Approval date
- ID of the transaction
- Address associated with the payment
- Signer Upload Button – you can use this button as many times as you need in a document to collect required files from the signer. Each time you add this button, the signer is required to upload at least one document. After upload, this button displays the name of the uploaded file, and the download location.
Intelligent Tag formatting
Before you add text or fillable PDF tags to your documents, it's important to understand how to format the tags correctly.
Both tag types follow the same format: SertifiTagType_SignerLevel_Order
Each tag should start with the word Sertifi, with the name of the tag appended to it. Then, specify the signer level using a 1 for first signers, 2 for second signers, and so on. You can also specify the order in which you want the signers to sign the document. For instance, if you have two first-level signers, you can append a 1 or a 2 to the end of the tag to specify which order you want the first-level signers to complete the document. So you would add SertifiSStamp_1 and SertifiSStamp_1_2 to a PDF for a document with two signers.
The order in the tags is based on the order in which you add signers to the file.
Use the following table to add text or fillable PDF tags to your documents:
If you pre-fill or preview your document after you tag it, you might notice the email address of your first signer appearing in the Sertifi Intelligent Tags. This is a visual way for you to see which tags are reserved for each signer. The signer's email doesn't stay populated in the tag once you send for signature.
Intelligent tag best practices
In order to efficiently use tags in your documents, consider the following best practices:
- Add tags to a document for all required signing levels. If a signer isn't added for a specific level when you create a request, the tags for that level are ignored.
- Add all levels of signers when you initially create the request. If you add signers to the file after you create the request, the tag locations won't work for those signers.
- Ensure there's enough space for the tags you want to use. All tags have a preset size. Make sure that all signature locations display appropriately before sending your documents.


